3.0
Published on 15 Sep 2025 by Marcin Kulik
I’m happy to announce the release of asciinema CLI 3.0!
This is a complete rewrite of asciinema in Rust, upgrading the recording file
format, introducing terminal live streaming, and bringing numerous improvements
across the board.
In this post, I’ll go over the highlights of the release. For a deeper overview
of new features and improvements, see the release
notes and the
detailed
changelog.
First, let’s get the Rust rewrite topic out of the way. I did it because I felt
like it. But seriously, I felt like it because I prefer working with Rust 100x
more than with Python these days. And this type of code, with syscalls and
concurrency, is way easier to deal with in Rust than in Python. That’s my
experience, YMMV. Anyway, in addition to making me enjoy working with this
component of asciinema again, the rewrite resulted in faster startup, easier
installation (a static binary), and made many new features possible by
integrating asciinema virtual terminal
(also Rust) into the CLI.
Let’s look at what’s cool and new now.
The new asciicast v3 file
format is an evolution of the good old asciicast v2. It addresses several
shortcomings of the previous format that were discovered over the years.
The major change in the new format is the use of intervals (deltas) for timing
session events. v2 used absolute timestamps (measured since session start),
which had its own pros and cons. One often-brought-up issue was the difficulty
of editing the recordings - timestamps of all following events had to be
adjusted when adding/removing/updating events.
Other than timing, the header has been restructured, grouping related things
together, e.g. all terminal-related metadata is now under term. There’s also
support for the new "x" (exit) event type, for storing the session exit
status. Finally, line comments are allowed by using the # character as the
first character on a line.
Here’s an example of a short recording in asciicast v3 format:
{"version": 3, "term": {"cols": 80, "rows": 24, "type": "xterm-256color"}, "timestamp": 1504467315, "title": "Demo", "env": {"SHELL": "/bin/zsh"}}
# event stream follows the header
[0.248848, "o", "Hey Dougal...\n"]
[0.248848, "o", "Yes Ted?\n"]
[1.001376, "o", "Is there anything on your mind?\n"]
[3.500000, "m", ""]
[0.143733, "o", "No."]
# terminal window resized to 90 cols and 30 rows
[2.050000, "r", "90x30"]
[1.541828, "o", "Bye!"]
[0.8870, "x", "0"]
The new format is already supported by asciinema
server and asciinema
player.
Live terminal streaming
The new CLI allows for live streaming of terminal sessions, and provides two
modes for doing so.
Local mode uses built-in HTTP server, allowing people to view the stream on
trusted networks (e.g. a LAN). In this mode no data is sent anywhere, except to
the viewers’ browsers, which may require opening a firewall port. The CLI
bundles the latest version of asciinema player, and uses it to connect to the
stream from the page served by the built-in server.
$ asciinema stream --local
::: asciinema session started
::: Live streaming at http://127.0.0.1:37881
::: Press <ctrl+d> or type 'exit' to end
$ _
Remote mode publishes the stream through an asciinema server (either
asciinema.org or a self-hosted one), which acts as a relay, delivering the
stream to the viewers at a shareable URL.
$ asciinema stream --remote
::: asciinema session started
::: Live streaming at https://asciinema.org/s/TQGS82DwiBS1bYAY
::: Press <ctrl+d> or type 'exit' to end
$ _
The two modes can be used together as well.
Here’s a live stream of btop running on one of the asciinema.org servers:
You can also watch it directly on asciinema.org at
asciinema.org/s/olesiD03BIFH6Yz1.
Read more about the streaming architecture and supported protocols
here.
asciinema player (seen above) supports all the described protocols. To make the
viewing experience smooth and glitch-free, it implements an adaptive buffering
mechanism. It measures network latency in real-time and adjusts the buffer size
constantly, aiming for a good balance between low latency and buffer-underrun
protection.
asciinema server can now record every live stream and turn it into a regular
recording. At the moment, asciinema server running at asciinema.org has stream
recording disabled and a concurrent live stream limit of 1, but you can
self-host the server where recording is enabled and there’s no concurrent
stream limit by default. The limits on asciinema.org may change. I’d like to
first see how the streaming feature affects resource usage (btw, shout-out to
Brightbox, which provides cloud services for
asciinema.org).
Local-first
In the early versions of asciinema, asciinema rec didn’t support saving to a
file - the recording was saved to a tmp file, uploaded to asciinema.org, and
the tmp file was removed. Later on, the CLI got the ability to specify a
filename, which allowed you to save the result of a recording session to a file
in asciicast v1 format and decide whether you want to keep it local only or
publish.
Although optional, the filename argument had long been available. However,
many, many tutorials on the internet (probably including asciinema’s own docs)
showed examples of recording and publishing in one go with asciinema rec.
That was fine - many people loved this short path from recording to sharing.
Over the years, I started seeing two problems with this. The first one is that
lots of people still think you must upload to asciinema.org, which is not true.
You can save locally and nothing leaves your machine. The second one is that
the optionality of the filename made it possible to unintentionally publish a
recording, and potentially leak sensitive data. And it’s a completely valid
concern!
Because of that, on several occasions I’ve seen negative comments saying
“asciinema is shady” /m\. It was never shady. It’s just a historical thing. I
just kept the original behavior for backward compatibility. asciinema.org is
not a commercial product - it’s an instance of asciinema server, which is
meant to give users an easy way to share, and to give a taste of what you get
when you self-host the server. In fact, I encourage everyone to self-host it,
as the recordings uploaded to asciinema.org are a liability for me (while being
a good promotion of the project :)).
I hope this clears up any confusion and suspicion.
Anyway, many things have changed since the original behavior of asciinema rec was implemented, including my approach to sharing my data with cloud
services. These days I self-host lots of services on a server at home, and I
try to avoid cloud services if I can (I’m pragmatic about it though).
The streaming feature was built from the ground up to support the local mode,
which came first, and the remote mode followed.
In asciinema CLI 2.4, released 2 years ago, I made the upload command show a
prompt where you have to explicitly make a decision on what to do with the
recording. It looked like this:
$ asciinema rec
asciinema: recording asciicast to /tmp/tmpo8_612f8-ascii.cast
asciinema: press <ctrl-d> or type "exit" when you're done
$ echo hello
hello
$ exit
asciinema: recording finished
(s)ave locally, (u)pload to asciinema.org, (d)iscard
[s,u,d]? _
It was a stopgap and a way to prepare users for further changes that are coming
now.
In 3.0, the filename is always required, and the rec command no longer has
upload capability. To publish a recording to asciinema.org or a self-hosted
asciinema server, use the explicit asciinema upload <filename>.
More self-hosting-friendly
A related improvement introduced in this release is the new server URL prompt.
When using a command that integrates with asciinema server (upload, stream,
auth) for the first time, a prompt is shown, pre-filled with
https://asciinema.org (for convenience). This lets you choose an asciinema
server instance explicitly and intentionally. The choice is saved for future
invocations.
It was always possible to point the CLI to another asciinema
server with a config
file or environment variable, but this new prompt should come in handy
especially when running the CLI in a non-workstation/non-laptop yet interactive
environment, such as a fresh VM or a dev container.
This change should make it easier to use the CLI with your own asciinema
server, and at the same time it doubles as an additional guard preventing
unintended data leaks (to asciinema.org).
Summary
I’m really excited about this release. It’s been in the making for a while, but
it’s out now, and I’m looking forward to seeing what new use-cases and
workflows people will discover with it.
It’s going to take a moment until 3.0 shows up in package repositories for all
supported platforms/distros. Meanwhile, you can download prebuilt binaries for
GNU/Linux and macOS from the GitHub
release, or build
it from source.
Thanks for reading to this point!
This is part 3 in the “what’s new in asciinema” series. In the first
part we looked at the player, in the second
part we covered the recorder, and in this one
we’ll focus on the server.
Let’s begin with OPS-related stuff.
asciinema.org uses email-based login flow, where you
get short lived login link (some call it “magic link”). Over last 10 years that
email was delivered via several email providers. From the top of my head,
roughly in order: Mailgun, Gmail, Sendgrid, Fastmail. I won’t go into details of
why I’ve been switching from X to Y, as the reason was different in each case,
but overall there was always something (and when it wasn’t a tech issue then it
was a price issue). The last switch happened a few months ago to AWS SES. It’s
been reliable (so far) and ridiculously cheap. asciinema server uses
Bamboo library for email delivery,
and thanks to Bamboo’s pluggable adapters it was trivial to switch. If you want
to use SES for email delivery with your own instance of the server then follow
the instructions
here.
Next, the recent integration of
libcluster
will ensure live features of Phoenix
framework, such as LiveView and PubSub, work
seamlessly in multi-node setups (like the one on asciinema.org). This will come
in handy for live streaming feature which should come soon (more on that in a
future post).
Concluding the admin/OPS side, I’ll mention that I moved the official docker
image of the asciinema server from docker.io/asciinema/asciinema-server to
ghcr.io/asciinema/asciinema-server. Docker Inc.’s recent hostility towards
open-source (without which it
wouldn’t have existed in the first place) didn’t feel right. While they later
apologized for “doing a terrible
job” it was too
little too late. Damage was done, I’m not going back there. They’re gonna pull
off something similar in the future. GitHub’s ghcr.io is
owned by another corporation, sure, but they seem to understand the value of
open-source communities better than current Docker Inc. management, therefore
until they prove me wrong I’m willing to keep the container images there. It’s
not that hard to migrate away if they do.
Shifting under the hood of the server, there’s been a lot of maintenance and
code refactoring. In addition to preparation for more real-time features
mentioned earlier, Elixir, Erlang and Phoenix, upon which the server is built,
were updated to newer versions (Elixir 1.14, Erlang/OTP 25.2, Phoenix 1.7). I
started converting view templates to new .heex format, which elegantly solves
view component reusability and composability, while ensuring HTML syntax
validity at compile-time. Super neat stuff, and I’m excited about this, even
though the conversion from .eex to .heex requires extra work.
Furthermore, the server got basic WebFinger endpoint
(my asciinema.org user in WebFinger lookup
service). Even
though it’s not very useful right now, it will become instrumental in future
developments ;)
SVG previews, which are available by appending .svg to a recording URL, got
support for “true color” (24-bit SGR variant):
https://asciinema.org/a/335480.svg
Finally, on the UI side, you might have noticed addition of Nord
theme in theme selector (both in user
settings and individual recording settings),
as well as new font selector, which allows using one of Nerd
Fonts variants with your recordings (useful if you
have fancy shell prompt with symbols/icons). Additionally, recording metadata,
i.e. icons for terminal environment (OS, term type, shell) and views count,
received a bit of polish. Recording index pages were updated to use an
appropriate number of thumbnail columns on various screen sizes.
Lastly, markers feature of the
player has been exposed on
recording settings page - you can configure a list of markers by simply listing
their times and labels like this:
5.0 - Intro
11.3 - Installation
32.0 - Configuration
66.5 - Tips & Tricks
This concludes the server-related improvements, and the “what’s new in
asciinema” series. I hope you enjoyed it. Don’t hesitate to reach out with
feedback, I’m all ears (not as much as this little
guy though).
Happy recording!
This is part 2 in the “what’s new in asciinema” series. In the first
part I looked at the player, in this one I’ll
focus on the recorder (aka CLI).
Fun fact: people use asciinema to record the terminal on Android. I would never
have thought of that but apparently there are folks who do that. Anyway,
recorder v2.0.2 (that’s not really recent…) improved Android support, so if
you’re a masochist who uses a terminal on a mobile device then you’re covered ;)
First feature I’d like to highlight is ability to “mute” the recording session,
i.e. temporarily disable capture of terminal output, which was implemented in
version 2.1 of the recorder. This is handy when you realize mid-session that you
need to paste a secret and you don’t want it to be recorded. Hit C-\ (ctrl +
backslash) to mute, do the secret work, then unmute by using the same hotkey.
The hotkey can be changed with rec.pause_key option in recorder’s config
file.
Out of necessity, the recorder received desktop notification integration in the
same release. See, asciinema recorder can’t really print anything to the
terminal during a recording session (technically it can, but we avoid it)
because this could mess up the output/expectations of a program currently
running in the foreground, e.g. a shell, vim etc. So in order to inform the user
that terminal capture has been suspended, which I believe is essential here, I
implemented desktop notifications which work out of the box on Linux and macOS.
You can use a custom notification command (notifications.command in config
file) if you like, e.g. to display the notification in tmux’s status bar or
with some OSD tool.
In v2.2, the recorder got new options to override the terminal size that’s
presented to the recorded process (e.g. your shell). Say your terminal has size
100x50 (cols x rows) and you want the recording to happen as if your terminal
had size 80x24. You can do this:
asciinema rec --cols 80 --rows 24 rec demo.cast
This forces the size of 80x24 on the PTY (pseudo-terminal) under which your
shell operates while being recorded, resulting in the shell (or any program you
launched in it, e.g. vim) drawing their UI thinking it’s 80x24 while your
terminal window is still 100x50. It’s neat and comes in handy when you use
tiling WMs, because those tend to fill the screen to the brim, which is good for
productivity but less so for recording a demo that’s meant to look good.
Also in v2.2, there have been a bunch of changes related to how asciinema
handles input and output. Specifically: where the input sent to the recorded
shell comes from, where the output of the shell goes to, and finally, where
diagnostic messages like “asciinema: recording asciicast to …” go to. Those
improvements don’t change much for the common asciinema rec demo.cast use
case, however they open interesting possibilities of composing the recorder with
other tools (and itself).
I’ll illustrate with few examples.
asciinema rec --stdin demo.cast
asciinema play --stream=i demo.cast | asciinema rec new.cast
Let’s break it down. First, we record the terminal, including the input
(--stdin option), to demo.cast file. Then, we replay only the input data from
it (--stream=i, added in v2.3), piping it to the recorder. In other words,
key presses from the first recording are driving the new recording session.
This lets you automatically re-record your demo e.g. with newer software
versions without manually typing the same commands again. How cool is that!
On a related note, check out autocast
by Paul Nettleton which lets you automate
creation of asciicast files in very comprehensive way.
Another nifty thing enabled by changes in v2.2 is the ability to pipe the
recorded asciicast to another process. Let’s do some live streaming to a browser
via WebSockets:
asciinema rec - | websocat -q ws-l:127.0.0.1:9002 -
Here, we pass - as the output filename, which, by convention writes the output
to stdout. It then gets piped into websocat
which starts a WebSocket server on port 9002, forwarding asciicast data it reads
from its own stdin to a WebSocket client.
It happens so that the player supports playback from WebSocket sources, which
we’ll utilize to connect to websocat server started above:
AsciinemaPlayer.create('ws://127.0.0.1:9002', document.getElementById('demo'));
The result is a real-time stream of a terminal session in the browser. It’s not
a proper streaming solution by any means, far from it, but rather a
demonstration of composability of asciinema CLI.
In fact, we can combine the two previous examples into the ultimate composition:
asciinema play --stream=i demo.cast | asciinema rec - | websocat -q ws-l:127.0.0.1:9002 -
A live stream is driven by key presses from an existing recording! 🤯
This concludes recorder-related improvements. I hope you enjoyed it. In the
next post, we’ll take a look at what’s new in
the server and maybe a few other
things.
Until my next update, happy recording!
There’s been a steady stream of asciinema releases over the last 12 months and I
thought it would be nice to bring notable additions and improvements to the
light. This is the first post in the “what’s new in asciinema” series, in which
I’ll focus primarily on the player,
highlighting changes I find most interesting. I will cover other parts of the
asciinema stack in future posts.
First, a complete rewrite of the player resulted in 4x smaller, 50x
faster version 3.0. This enabled a lot of possibilities
and vastly improved integration of self-hosted player on websites.
Player v3.1 brought about improved terminal emulation, thanks to gradually
evolving avt - asciinema virtual terminal.
We also got rendering of faint graphic rendition - SGR
2,
as well as the inclusion of Nord theme in the
bundled CSS file.
Control bar display behaviour was improved in v3.2. The bar was moved below the
last terminal line. In previous versions it already automatically disappeared
when player detected lack of user interaction, however it still obscured the
last terminal line during such interaction. Later, in v3.4, new
controls option
was added which can be used to force control bar to be always visible (true)
or always hidden (false). You can see the “always-on” control bar in the
markers demo later in this post.
This same release introduced the concept of recording
parsers, which allows
playback of terminal sessions in formats other than player’s native asciicast
format. Later, player v3.4 bundled parsers for
ttyrec and typescript files (produced by
script command). See
my Blast from the past post for Star Wars
asciimation parser example.
Also in v3.2 player got ability to step through a (paused) recording one frame
at a time by pressing . (dot) key. This adds to a list of other useful key
bindings like space (toggle play/pause), f (toggle fullscreen), ] (jump to
next marker, see below), and few
others. Feel free to test
these in the player below.
Then, with v3.3, the player became more friendly for Reveal.js slide embeds.
However, probably the highlight of the release is support for input
events
embedded in asciicast files when recording with input capture enabled
(asciinema rec --stdin demo.cast).
For example, “the ’t’ key was pressed at 5 seconds” is saved in asciicast as the
following event line:
If you’re self-hosting the player you can subscribe to input events with
player.addEventListener
(doc). Say, you
want to play Cherry MX Brown (eeewww!) sound for each key press.
const player = AsciinemaPlayer.create({
  url: '/typing.cast',
  inputOffset: -0.125
}, document.getElementById('demo'));

player.addEventListener('input', e => {
  playSound('/Cherry_MX_Brown.wav');
});
Below is the result (make sure your audio is not on mute):
It sounds mechanical and not very natural because I used a single sample, so
there’s no variation whatsoever. For more natural effect use multiple samples,
and have a special one for space key which often sounds different than the rest,
due to its size and the way it’s mounted. The event argument, passed to the
callback, has data property, which corresponds to asciicast input event’s 3rd
field (“t” in the example earlier). This can be used to check which key was
pressed and what sample to play.
I used new inputOffset option with a value of -0.125 (sec) to shift input
events in time. I did it because the key press sample I use has a bit of a slow
attack, so by firing the sound slightly earlier I got the audio in better sync
with the display.
Next, player v3.4 and
markers. This feature was
often requested, and one which was added to the whole stack (player, server,
recorder). Let’s take a look at that next.
In the player below notice the dots on the timeline. Those are markers which,
when hovered, show time and text labels. Markers mark chapters or other
interesting points in the timeline of a recording.
As expected, clicking on a marker fast-forwards/rewinds the recording to
selected position. You can also navigate between markers by pressing the [
and ] keys which respectively jump to previous and next marker. You can also
seek to a marker
programatically.
There are several ways to add markers to a recording. If you keep your
recordings on asciinema.org or you self-host the
server you can add
markers on recording’s settings page. If you use the player on your own site you
can pass markers via new
markers option like
this:
AsciinemaPlayer.create('/demo.cast', document.getElementById('demo'), {
  markers: [
    [5.0,   "Installation"],  // time in seconds + label
    [25.0,  "Configuration"],
    [66.6,  "Usage"],
    [176.5, "Tips & Tricks"]
  ]
});
Finally, you can embed markers directly in asciicast files. Marker events look
similar to input events we saw earlier, but the event code is m here:
[25.0, "m", "Configuration"]
Those can be added to a recording either during the recording session by
pressing a hotkey (see rec.add_marker_key config
option) or after
recording by adding lines like the one above to the asciicast file.
There’s also new
pauseOnMarkers
option which tells the player to automatically pause the playback when reaching
next marker. This is super useful for “live” demos as it lets you discuss
terminal output at precise points.
This concludes player-related improvements. In the next
post, we’ll take a look at what’s new in the
recorder, aka CLI.
Until my next update, happy recording!
Blast from the past
Published on 19 Jun 2023 by Marcin Kulik
Did you know that the first prototype of what later became the asciinema player
replayed “typescript” files produced by script
command?
In fact, the whole asciinema project originated with the player, not with the
command line recorder. That was back in 2010. I was having fun with script and
scriptreplay commands, when I imagined being able to easily share typescript
files with fellow geeks, who could watch the recordings in their browsers. I
wrote a rough parser/interpreter for typescript format and got some characters
moving happily on a page with the help of a bunch <div> and <span> elements.
Back then, script version found in most Linux distros was capable of saving
timing information to a second file with -t option (later deprecated,
superseded with newer -T). For playback, timing information is essential, so
all was great. Except, I wanted to support macOS (or, then “OS X”) as well as
*BSD systems. The version of the script command that was shipped with OS X
unfortunatelly didn’t support saving timing information. I learned this by
causing many work interruptions to my colleague MacKuba,
who was working on OS X and was sitting in the same office room as me.
I figured out how script works, what is a PTY, TTY and whatnot, and eventually
found Python’s pty module which
had a small code example at the bottom of the page, which showed how to write
your own (simplified) script in Python with nothing more than standard
library. I tested this on Linux and OS X - worked beautifully. So I decided to
drop script and create my own recorder with its own JSON-based recording
format -
asciicast.
The rest is history.
Fast-forward to 2023. script on all popular platforms, including macOS,
supports saving timing information (this happened somewhere between 2011 and now,
but not sure when precisely). JS has fetch
API (since 2015),
which, combined with full adoption of
ArrayBuffer
and
TypedArrays
allows fetching and parsing files in any format with relative ease.
Which brings us to recently released asciinema player
3.4.0, which
added support for additional recording formats through
parsers. In addition to
asciicast (v1 and
v2), which has been THE
recording format of the player since the beginning, asciinema player can now
replay typescript recordings, ttyrec
recordings (produced by
ttyrec, termrec or
ipbt), as well as any
other terminal recording format you write a custom parser for.
Here’s how to use the player with typescript recordings:
AsciinemaPlayer.create({
  url: ['/demo.timing', '/demo.data'],
  parser: 'typescript'
}, document.getElementById('demo'));
Note url above being an array of URLs pointing to typescript timing and data
files.
And here’s how to use the player with ttyrec recordings:
AsciinemaPlayer.create({
  url: '/demo.ttyrec',
  parser: 'ttyrec'
}, document.getElementById('demo'));
See parsers documention for more details.
Note: typescript and ttyrec recordings can be used with self-hosted asciinema
player. As of this writing
asciinema.org supports asciicast files only.
One more thing…
I mentioned playing custom recording formats. Let’s do one more blast from the past.
In 1997 Simon Jansen created initial version of his famous Star Wars
Asciimation. You may have seen it via telnet towel.blinkenlights.nl (defunct as of 2023). Simon’s asciimation file format is
a simple text format, where each animation frame is defined by 14 lines. First of
every 14 lines defines duration a frame should be displayed for (multiplied by a
speed constant, by default 67 ms), while lines 2-14 define frame content -
text to display.
Let’s write asciinema player parser for it:
const LINES_PER_FRAME = 14;
const FRAME_DELAY = 67;
const COLUMNS = 67;
const ROWS = LINES_PER_FRAME - 1;

async function parseAsciimation(response) {
  const text = await response.text();
  const lines = text.split('\n');
  const events = [];
  let time = 0;
  let prevFrameDuration = 0;

  events.push([0, 'o', '\x9b?25l']); // hide cursor

  for (let i = 0; i + LINES_PER_FRAME - 1 < lines.length; i += LINES_PER_FRAME) {
    time += prevFrameDuration;
    prevFrameDuration = parseInt(lines[i], 10) * FRAME_DELAY;
    const frame = lines.slice(i + 1, i + LINES_PER_FRAME).join('\r\n');
    let text = '\x1b[H'; // move cursor home
    text += '\x1b[J'; // clear screen
    text += frame; // print current frame's lines
    events.push([time / 1000, 'o', text]);
  }

  return { cols: COLUMNS, rows: ROWS, events };
}

AsciinemaPlayer.create(
  { url: '/starwars.txt', parser: parseAsciimation },
  document.getElementById('demo')
);
Here it is in action:
Maybe Simon finishes it one day :)
It’s been a while since asciinema-player 2.6 was released and a lot has changed
since. Version 3.0 is around the corner with so much good stuff, that even though
it’s not released yet, I couldn’t wait any longer to share.
Long story short: asciinema-player has been reimplemented from scratch in
JavaScript and Rust, resulting in 50x faster virtual terminal interpreter, while
at the same time, reducing the size of the JS bundle 4x.
You may wonder what prompted the move from the previous ClojureScript
implementation. As much as I love Clojure/ClojureScript there were several major
and minor problems I couldn’t solve, mostly around these 3 areas:
-
speed - I wanted the player to be ultra-smooth, even for the most heavy
animated recordings. Due to ClojureScript’s immutable data structures, there’s a
lot of objects created and garbage collected all the time, and for the high
frame-rate, heavy animations this puts a lot of pressure on CPU and memory. The
new implementation of the virtual terminal interpreter in Rust (compiled to
WASM) does it 50x faster. Additional speed improvement comes from porting the
views from React.js to SolidJS, one of the fastest UI
libraries out there.
-
size - the output bundle from ClojureScript compiler is rather big. It’s fine
when you build your own app in ClojureScript, however when you provide a library to
use by other people on their websites, it’s quite bad. 2.6 is 570kb (minified) -
that’s over half a megabyte. That bundle contains whole ClojureScript standard
library, several popular and useful libraries like reagent, core.async, and
finally React.js (via reagent). The new 3.0 is pure JS with pretty much just
SolidJS as the only dependency (which is tiny itself). This makes the new player
much smaller, ~140kb (minified), even though it includes embeded WASM bytecode
(which makes the bulk of the bundle size).
-
integration with JS ecosystem - ClojureScript is not that easy to integrate
with the JS ecosystem. I know, there’s been a lot of improvements done in this
space over the years, and I’m sure someone will immediately point me to relevant
docs, but it’s still the extra mile you need to go when compared to regular JS
codebase, and some things didn’t have any support last time I checked (like
embedding WASM in the bundle). Things might have changed here, but first two
arguments above still hold, so it was worth it. And as a result, you can now use
the player in your own app by importing the ES module provided by
asciinema-player npm
package.
Btw, special shout out to Ryan Carniato, the author of SolidJS, for focusing on
speed and simplicity, while not compromising on usability. Thanks Ryan!
Now, on top of all the above, I had fun building terminal control sequence
interpreter in Rust, using excellent
resource for that - Paul Williams’ parser for ANSI-compatible video
terminals. Special shout out to Paul
Williams!
But back to speed. It used to be good enough, which is no longer good enough for
me. The old player used to be sufficiently fast for probably 90% of the
recordings people host on asciinema.org. It
exercised many types of optimizations, like memoization (trading memory for CPU
time) and
run-ahead
(which used a lot of memory by precomputing terminal contents for each future
frame).
At first I planned to implement the terminal emulation part in Rust without any
optimizations, just write idiomatic Rust code, then revisit the tricks from the
old implementation. The initial benchmarks blew my mind though, showing that
spending additional time on optimizing the emulation part is absolutely
unnecessary.
The numbers show how many megabytes of text the terminal emulator can process in
each player version (tested on Chrome 88):
50 times faster on average!
Note that the above benchmark represents the speed of text stream parsing
(including control sequences), as well as updating emulator’s internal, virtual
screen buffer. This has been the bottleneck in the previous implementation of
the player. The benchmark doesn’t measure rendering of the buffer to the actual
screen (DOM), therefore the rendering speed improvements coming from
React.js->SolidJS transition are not included here. However, SolidJS has been
benchmarked against React.js and other libs many times already, so I didn’t
bother proving it’s faster.
I still thought I may need to implement some form of terminal state
snapshot/restore to support the “seeking” feature. This feature requires feeding
the terminal emulator with the whole text stream between the current position
and the desired position, or in the worst case when you’re seeking back, feeding
the emulator with the whole text from the very beginning of the recording up to
the desired position. Optimizing this could be done, for example, by keeping
snapshot of the terminal emulator state at multiple time points, sort of like
having key-frames every couple of seconds. In ClojureScript implementation this
came for free, thanks to the immutable data structures. In the new JS+Rust
implementation this would have required extra work, but it turned out, that’s not
needed either - clicking on the progress bar in the new player, to jump to the
desired time in the recording, results in instantaneous jump, even when it has to
feed the emulator with megabytes of data to parse and interpret.
Other than the speed and size improvements, the new version of the player brings
more nice things, like automatic scaling of the player to fill its container (as
seen above), as well as WebSocket and custom “drivers”. More on these in the
upcoming posts.
Since asciinema’s inception in 2012 there were over 200,000 asciicasts uploaded
to asciinema.org 🎉😻.
As of today (end of 2018) there are ~85,000 unclaimed recordings, which are ones
that have been uploaded by anonymous users, who never linked their installation
to their asciinema.org account.
Most of these unclaimed recordings are “abandoned” (recorded, watched once,
forgotten), therefore we’re going to archive them, and enable daily
auto-archival (related
PR) on asciinema.org
soon.
What’s auto-archival?
The idea behind this feature is to automatically “garbage collect” all unclaimed
recordings. It will ensure the recordings that are preserved are linked to real
user accounts, and these users can potentially be reached by email (abuse
reports etc). This will eventually also clean up the storage (save some bucks on
hosting).
How does this affect me?
If you haven’t linked your local installation to asciinema.org account (via
asciinema auth command), on each upload you’re going to see this message
printed in the terminal:
View the recording at:

    https://asciinema.org/a/159P2NxIoO6vkGS4lM259Y72A

This installation of asciinema recorder hasn't been linked to any asciinema.org
account. All unclaimed recordings (from unknown installations like this one)
are automatically archived 7 days after upload.

If you want to preserve all recordings made on this machine, connect this
installation with asciinema.org account by opening the following link:

    https://asciinema.org/connect/<your-install-id>
Archived recordings won’t be deleted, they’ll be hidden from listings and
inaccessible via direct link. Actual removal from database and file store will
happen some time after archival, but probably not sooner than few weeks/months
after archival. For the time being we’re gonna keep them for a while, and figure
out what’s a reasonable TTL for pruning them.
Schedule for enabling auto-archival on asciinema.org
The above warning message is already active on asciinema.org, however actual
archival is not enabled yet. We’re planning to enable archival on 31st
January 2019. On that day all existing unclaimed recordings will be archived,
and all new ones that are not claimed within 7 days from upload will be
auto-archived (daily).
How can I make sure I don’t lose my recordings?
First thing to do is to run asciinema auth today, to link your installation to
asciinema.org account (especially if you have
embedded your recordings in a place like
your project documentation, publicly shared slide deck etc).
Linking your installation to online account will ensure no recording uploaded
from this machine will be subject to archival. It will not un-archive already
archived recordings, but it will prevent archival of the already uploaded ones
which are less than 7 days old.
If after doing the above you don’t see the recording(s) on your profile page
then most likely they were uploaded from a different machine (or different local
system account). More about this
here.
In such case send email to admin@asciinema.org and we’ll help you restore it.
2.0
Published on 18 Feb 2018 by Marcin Kulik
I’m very happy to announce the release of asciinema 2.0!
It’s been 3 years since 1.0 (time flies!), and during this period many ideas
have been brought to life through series of minor releases. This time the scope
and importance of the changes required major version bump.
Below we’ll go through all the changes in detail, you can also read the
CHANGELOG
for a shorter version.
asciinema 2.0 saves recordings in new asciicast v2
format.
It’s based on newline-delimited JSON spec, and enables
incremental writing and reading of the recording.
It solves several problems which couldn’t be easily fixed in the old format.
Mainly:
- when the recording session is interrupted (computer crash, accidental close of
terminal window) you no longer lose the whole recording,
- minimal memory usage when recording and replaying long sessions - disk space
is the only limit now,
- it’s real-time streaming friendly (more on that below).
Due to file structure change (standard JSON => newline-delimited JSON) version 2
is not backwards compatible with version 1. Support for v2 recordings has
already been added in asciinema web
player (2.6.0) and asciinema
server (v20171105 tag in git
repository). These will handle both v1 and v2 playback nicely, older versions of
the recorder, player and server won’t be able to play v2 recordings though.
asciinema.org is now running the latest server and web player code and thus it fully supports this new format.
Terminal-to-terminal streaming
Previous versions of asciinema supported in-terminal playback by piping in the
recording to its stdin:
cat /path/to/asciicast.json | asciinema play -
ssh user@host cat asciicast.json | asciinema play -
While useful in some scenarios, the whole recording had to be read into memory
before starting the playback (you can’t easily parse JSON partially). New
format, being stream friendly, allows starting the playback immediately after
receiving the header line.
For example, you can now do terminal-to-terminal streaming via a named Unix
pipe:
mkfifo /tmp/demo.pipe

# viewing terminal
asciinema play /tmp/demo.pipe

# recording terminal
asciinema rec /tmp/demo.pipe
Or stream terminal over the network with netcat:
# viewing terminal (hostname: node123)
asciinema play <(nc -l localhost 9999)

# recording terminal
asciinema rec >(nc node123 9999)
With new --raw recording mode (more on that below) you don’t even need
asciinema installed on the viewing machine:
# viewing terminal (hostname: node123)
nc -l localhost 9999

# recording terminal
asciinema rec --raw >(nc node123 9999)
Appending to existing recording
You can now append new session to an existing asciicast file.
This can be useful when you want to take a break when recording.
Start recording:
When you need a break, press <ctrl+d> to finish recording. Then when you’re ready to continue run:
asciinema rec --append demo.cast
You can do this as many times as you want.
Raw recording mode
You can now save raw stdout output, without timing information or other
metadata, to a file:
asciinema rec --raw output.txt
The output file produced in this case is not in asciicast format, and is exactly like the one produced by
script command (without timing file).
You can then use cat to print the result of the whole session:
Stdin (keystroke) recording
Stdin recording allows for capturing of all characters typed in by the user in
the currently recorded shell:
asciinema rec --stdin demo.cast
This may be used to display pressed keys during playback in
asciinema-player (not
implemented yet!). Because it’s basically a key-logging (scoped to a single
shell instance), it’s disabled by default, and has to be explicitly enabled via
--stdin option.
Pausing playback
When replaying the asciicast in terminal with asciinema play demo.cast, you
can now press space to pause/resume. When paused, you can use . (dot key)
to step through the recording, a frame at a time, which can be very useful
during presentations! And, as before, ctrl+c will exit.
New cat command
While asciinema play <filename> replays the recorded session using timing
information saved in the asciicast, asciinema cat <filename> dumps the full
output (including all escape sequences) of the recording to a terminal
immediately.
When you have existing recording, this command:
asciinema cat existing.cast >output.txt
produces the same result as recording raw output with:
asciinema rec --raw output.txt
Summary
I’m especially happy about the first class support for real-time, incremental
recording. It’s not only important for the features introduced with this
release, but it nicely prepares the ground for other live streaming options
(directly to web player, or indirectly to web player via asciinema-server). This
will most likely be an area where the most focus will go in the future.
Some of the native packages have already been updated (thanks to awesome
package maintainers!), the
rest will hopefully follow soon. See installation
docs for detailed instructions for you
system.
Enjoy better terminal recording and sharing!
We have just released asciinema web player v2.3.0. Since v2.0.0 there were two
smaller releases bringing lots of improvements (see
the
CHANGELOG),
but this one definitely deserves a post of its own.
This new version makes self-hosting of the player even simpler. Let’s see an example.
Before:
<div id="player-container"></div>
<script>
  asciinema.player.js.CreatePlayer('player-container', '/demo.json');
</script>
Today:
<asciinema-player src="/demo.json"></asciinema-player>
Awesome, right?
This is possible thanks
to HTML5 Custom Elements,
which allow web developers to define new types of HTML elements. New
asciinema-player.js includes definition of new AsciinemaPlayer element type
and its associated <asciinema-player> tag. The .js bundle also provides
Custom Element polyfill which makes the new element working in browsers which
don’t support this feature yet.
The element supports several attributes known from <video> element like
loop, autoplay, preload, as well as asciinema-specific ones like speed,
theme, font-size.
See
README
for a quick “getting started with self-hosting” guide and a description of all
supported attributes.
Enjoy!
I’m very happy to announce the release of asciinema 1.3, which is kind of a
special release. It brings several bug fixes and improvements for end users, and
at the same time it makes life of asciinema developers (mostly me) and package
maintainers (many people!) way easier.
See
CHANGELOG
for a detailed list of changes, continue reading for motivation on transitioning
back to Python.
Wait, what? Back to Python? Yes, asciinema 1.3 brings back the original Python
implementation of asciinema. It’s based on 0.9.8 codebase and adds all features
and bug fixes that have been implemented in asciinema’s Go version between 0.9.8
and 1.2.0. We’ll keep the Go implementation in
golang branch, it won’t be
maintained though.
While Go definitely has its strengths (easy concurrency, runtime speed, startup
speed, stand-alone binary), this project didn’t really benefit from any of these
(and suffered from Go’s pain points). Here is a (not exhaustive) list of things
that contributed to the decision of dropping Go for Python:
- No need for concurrency or high speed here.
- Python is high level language while Go is lower level language (I think
it’s fair to say it’s C 2.0). 95% of asciinema codebase is high level code and
there’s basically a single file containing system calls like
select/signal/ioctl/fork.
- Build problems: pty/terminal related Go libs don’t support as many
architectures and
operating systems while
Python runs basically on every UNIX-like system.
- Go’s lack of versioned packages and central repository makes packaging
cumbersome. For example, some distro packaging rules don’t like
straight-from-github-master dependencies (understandable!) while at the same
time they don’t like vendored (bundled) dependencies (also understandable)
(Gentoo example).
- Batteries included: argparse, pty, locale, configparser, json, uuid, http. All
of these excellent modules are used by asciinema and are part of Python’s
standard library. Python stdlib’s quality and stability guarantees are order
of magnitude higher than of unversioned Go libs from Github (I believe
discrete releases ensure higher quality and more stability).
- The less external dependencies the easier the job for native package
maintainers - as of this moment we have zero external dependencies!
- Casting int32 to int64 to… gets old fast.
if err != nil { gets old even faster.
asciinema recorder codebase (and feature set) is relatively small (under 900
LOC currently) so it wasn’t a big effort to port all newer features on top of
the old Python implementation.
Note, that the above list applies specifically to asciinema recorder. There are
great use cases for Go (like IPFS) and if I was to build
system-level software, protocol implementation or any kind of network daemon
(proxy for example) I’d definitely consider Go. Also, asciinema is a cli app
distributed to end users. If you’re building in-house software that has to run
only on single platform then many of the above points may become non-issue for
you.
Anyway, it feels good to be back on Python!
2016-07-14 update: Many people raised a question: why was it ported from
Python to Go in the first place? There were several reasons. First, Go’s static
binaries nicely solve the packaging problem (we didn’t have that many native
packages then and pip install asciinema wasn’t always reliable due to the fact
that it supported both Python 2 and 3). It later appeared that majority of
people prefer native packages so distributing precompiled binaries wasn’t a big
win for this type of project in the end. Second, Go was initially advertised as
a “systems language”, and if your program does system stuff like
select/signal/ioctl then Go should be perfect, right? Well, it appears that Go
excels (and was built for) slightly different things (multi-core concurrency,
networking, distributed systems). It is no longer advertised as a “systems
language” by its authors. Third, Go’s static type system with type inference and
functions as first class citizens felt like a nice bonus. In reality, the lack
of generics forces you to write lots of boilerplate and repetitive code. 20
lines of boilerplate, imperative code is not simpler and easier to understand
(like some Go defendants claim) than 2 lines of higher level code because it
adds noise to the essence of algorithm. When reading code you don’t need that
level of granularity in most cases. Well, at least I don’t need it :) Fourth, it
was interesting to apply my knowledge of this domain to a language with
different qualities. I would lie if I said having fun wasn’t part of the thing.
Self-hosting
Published on 06 Jan 2016 by Marcin Kulik
I’m very happy to announce version 2.0 of the asciinema web player. There are
several exciting aspects of this release so let’s get straight to the point.
First, the new player directly supports
asciicast v1 format.
In other words, there is no need to pre-process the recording upfront, before
passing it to the player. This is possible thanks to built-in terminal emulator
based on
Paul Williams’ parser for ANSI-compatible video terminals.
It covers only the display part of the emulation, as this is what the player is
all about (input is handled by your terminal+shell at the time of recording
anyway). Handling of escape sequences is fully compatible with most modern
terminal emulators like xterm, Gnome Terminal, iTerm, mosh etc.
This is cool in itself, but the best part of it is that it enables self-hosting
of the recordings on your own website, without depending on
asciinema.org. If you’re not comfortable keeping your
recordings on asciinema.org (“in the cloud” == “other people’s computers”), or
you simply prefer to own and fully control your content, this release solves
this problem for you. Just place player’s .js + .css files together with
.json file of your recording in your web assets directory, and insert short
<script> tag in your HTML. Take a look at
README for quick start.
It’s also worth mentioning that this version of the player (including terminal
emulator part) has been implemented in ClojureScript. If you were sceptical
about performance of compile-to-javascript languages and/or performance of
immutable data structures then this will hopefully convince you that there’s no
need to worry about it. ClojureScript compiler does a wonderful job of
converting high level Clojure code into highly optimized, fast JavaScript code.
If it’s possible to build a performant player like this one in ClojureScript
then you can build anything in ClojureScript. Look at the
source
if you’re curious how it looks like.
Check
asciinema/asciinema-player on
Github for API documentation and usage examples.
Enjoy!
Private asciicasts
Published on 11 May 2015 by Marcin Kulik
The core idea behind asciinema.org is to allow anyone to share the recording of
their terminal session by simply sharing a link to your asciicast page. Since
the inception of asciinema all recordings has been public. We wanted to
encourage you to share your knowledge, show off your tricks, and allow others
to learn from it.
It appears though that the nature of the asciicasts is often semi-private. Many
of you would like to record something and share it with a selected group of
people only, your team-mates for example. There were requests
for private
asciicasts. There were some
ideas to workaround the fact that everything on asciinema.org was public.
asciinema would be way more useful if it allowed you to decide if and with whom
you share the recordings, wouldn’t it?
The good news is as of today all new recorded asciicasts are private by
default. They get unique, secret URLs (like Github’s gists) which means you can
share them with selected people as easy as before. Whoever gets the secret link
can view the asciicast. Private asciicasts are not listed on the
Browse page or anywhere else on the site.
Public asciicasts are still a thing though, and you can publish any of your
recordings by clicking “Make public” in gear dropdown menu on an asciicast
page. If you’d rather have all your new recordings public by default you can
change the visibility policy on your asciinema.org account settings page.
It’s possible that next version of asciinema recorder will have -p and -P
switches for asciinema rec and asciinema upload commands, which will force
private (-p) or public (-P) visibility for a single asciicast, overriding the
default account policy.
Enjoy!
Support for embedding asciicasts just got way more awesome. See embedding
docs for details, read on for examples.
Embedding on your site
In addition to the existing support for embedding full player widget on your
page, you can now use image link to display a screenshot linking to your
recording on asciinema.org. This is useful in places where script tags are not
allowed, for example in Github README files.
You can get the embed snippets for a specific asciicast by clicking on “Embed”
link on asciicast page.
Here’s an example of how the image link looks like:

Embedding on Slack, Twitter and Facebook
asciinema.org supports oEmbed, Open
Graph and Twitter
Card protocols now. When you share an
asciicast on Twitter, Slack, Facebook, Google+ or any other site which supports
one of these APIs, the asciicast is presented in a rich form (usually with a
title, author, description and a thumbnail image), linking to your recording on
asciinema.org.
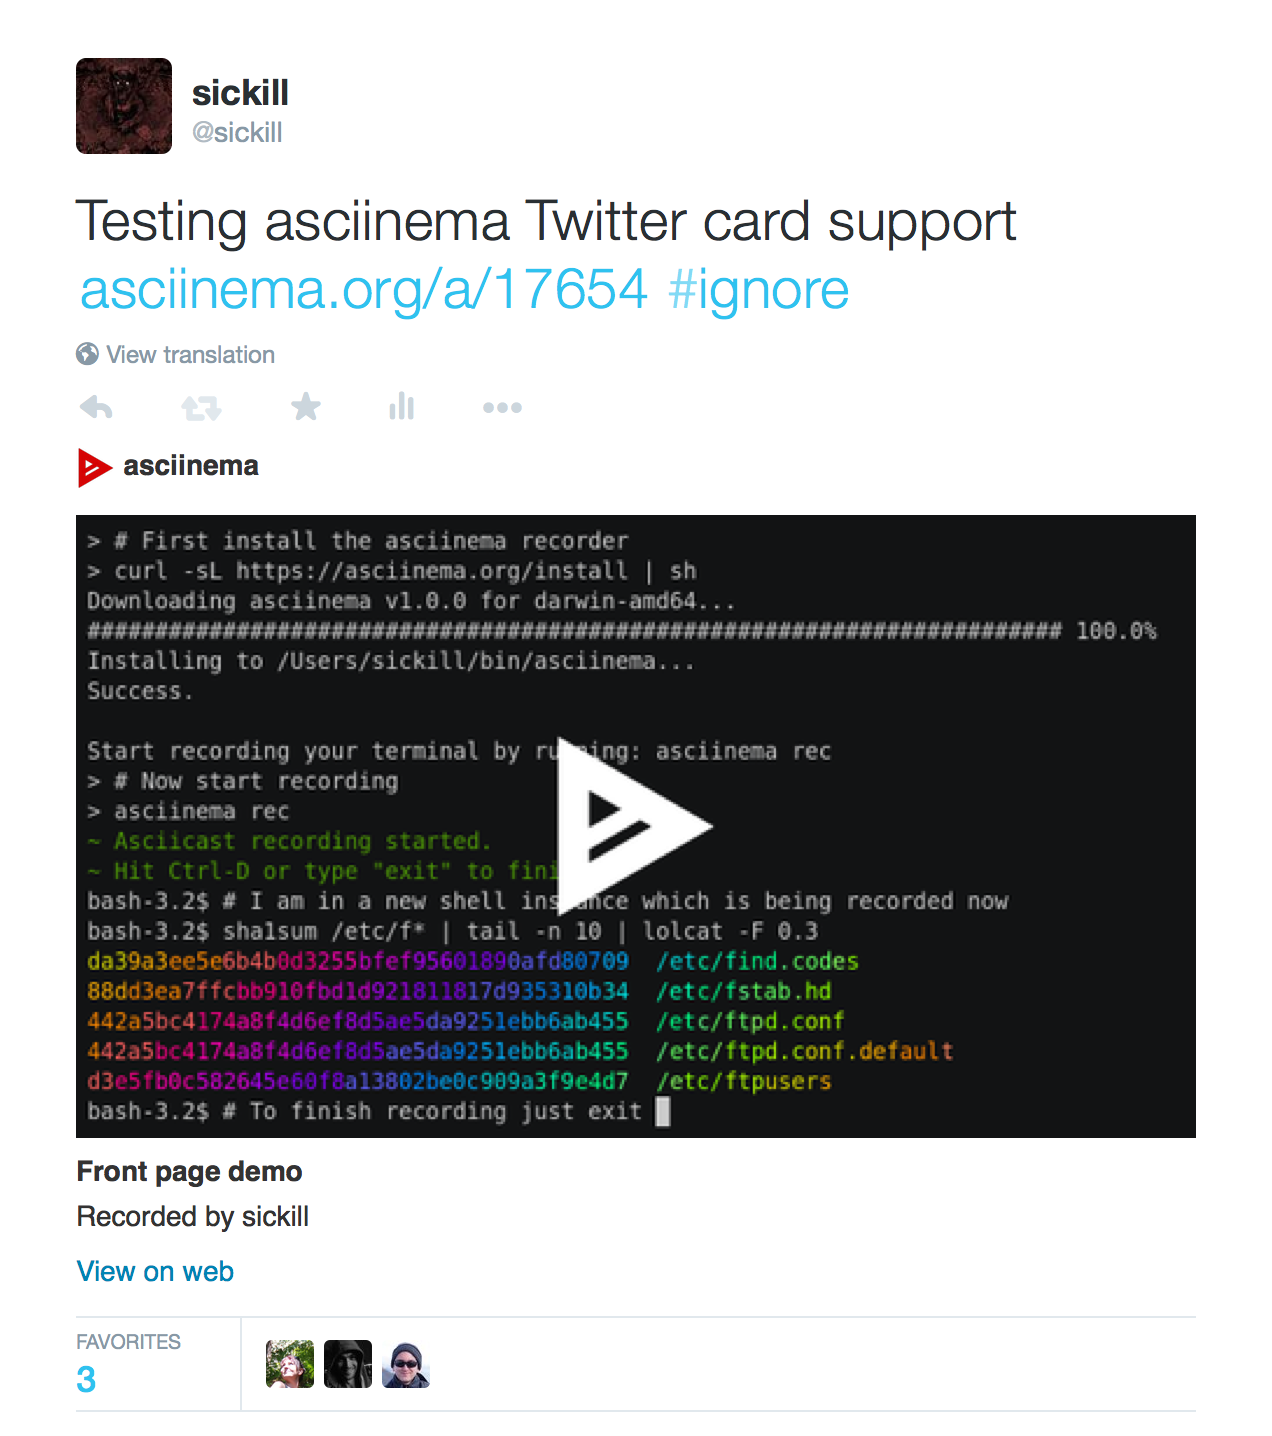
Here’s how it looks on Slack:
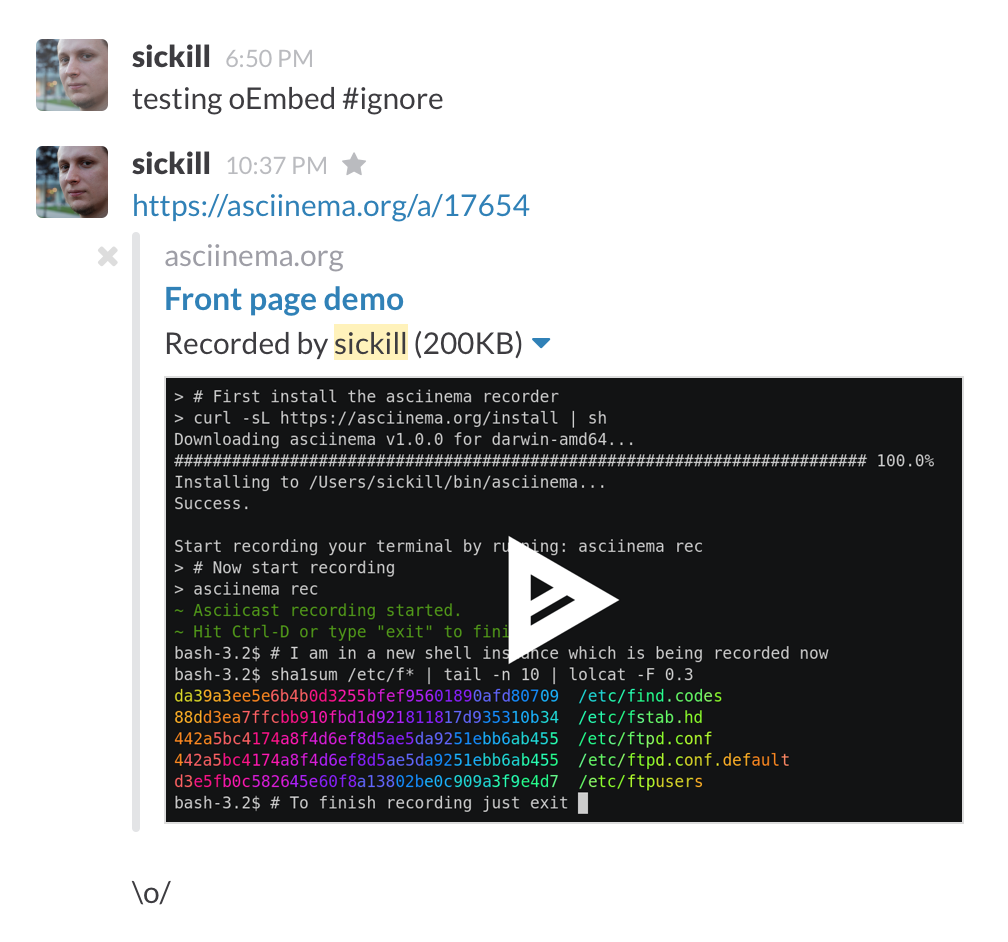
And here’s my tweet including a link to the same asciicast:
1.0
Published on 13 Mar 2015 by Marcin Kulik
I’m very happy to announce the release of asciinema 1.0, which brings many
long-awaited features and settles the ground for even more awesome features and
improvements coming in the future.
See
CHANGELOG
for a detailed list of changes, continue reading for highlights of this
important release.
Idle time optimization
Did you ever wish you had more powerful machine because this software
compilation you’re recording takes long time? Or maybe you wanted to pause the
recording process, plan your next steps, and then resume recording? If you said
“yes!” to any of the above then you may like asciinema’s new option.
asciinema rec command learned new option: --max-wait. It allows limiting
idle time, by replacing long pauses (terminal inactivity) with shorter ones.
You use it like this:
asciinema rec --max-wait=2
This starts recording session in which all pauses longer than 2 seconds are
replaced with exactly 2 second ones.
An asciicast is worth a thousand words, so let’s compare recording
with and without --max-wait. First, let’s look at the result of
recording with plain asciinema rec:
Now, let’s look at the result of recording the same thing, this time with
asciinema rec --max-wait=2:
Using this new option will make you look like you always know what to do next,
you’re confident, and last but not least - you own a super computer that can
compile the biggest project in a matter of seconds. How cool is that?
Local workflow
Another improvement to asciinema rec is its ability to save the recording to
a local file.
asciinema rec demo.json
This saves the session to demo.json file. Now, you can replay it directly in
your terminal:
asciinema play demo.json
Finally, if you’re happy about it and you want to share it on asciinema.org
just run:
asciinema upload demo.json
Let’s see it in action:
If you don’t need to keep your recording local and just want to record and
upload in one step, you can still asciinema rec without a filename.
Due to the fact that previous versions of asciinema recorder didn’t allow
saving recordings locally, there was no stable and documented “asciicast
format”.
This changes with 1.0. The file produced with asciinema rec <filename> is a
simple JSON file with a strict set of attributes. The format is versioned to
allow future extensions while preserving backwards compatibility. See
asciicast file format version
1.
If you know how to deal with ansi escape
sequences you can manually
edit your recordings with a text editor, or build a tool that can post-process
them.
Configuration file
There are several new options that can be set in ~/.asciinema/config file.
See
README
for a description of all of them.
Here’s an example of setting --max-wait permanently, so you don’t need to
pass it manually on each invocation of asciinema rec:
[record]
maxwait = 2
Installing
All available installation methods can be found on installation
page.
Note: not all native packages may be updated yet. If you want to make sure
you’re getting the latest version of asciinema download a binary for you
platform here.
The future
The changes introduced in this release, in addition to being valuable by
themselves, enable even more awesomeness in the future. For example, the
upcoming ability to self host (yes!) your recordings (without depending on
asciinema.org) wouldn’t be possible without having a way to record to a file
with a well defined format.
I hope you’ll enjoy the future. Meanwhile, enjoy asciinema 1.0!
So far you could log in to asciinema using your Github
or Twitter account via OAuth. The idea behind this was twofold:
- avoid passwords,
- make it as simple as possible.
Passwords are insecure, inconvenient and annoying. Inconvenience of passwords
was nicely summed up by Xavier in his
tweet saying “password
reset is the new login”. So the OAuth flow, being very simple for the user
(given he/she is already logged in at the provider), helped
achieving the initial goals.
And while OAuth based login worked totally fine it made asciinema dependent on
commercial vendors for no good reason. OAuth was designed for API authorization
between applications, not for user authentication. asciinema doesn’t need
access to user’s Github repositories nor user’s tweets. It just needs the
ability to authenticate a user. Also, the assumption that everyone has either
Github or Twitter account is simply wrong.
The assumption that everyone has an email address is a correct one though.
E-mail is ubiquitous and everyone remembers his/her own address. Can’t we just
use it as an ID on the web? Mozilla believes we can and
we should. Mozilla Persona, a reference
implementation of BrowserID protocol, puts the email address at the center of
authentication and gives us simple, privacy-sensitive single sign-in solution.
asciinema team believes in Mozilla’s mission for promoting openness and
innovation on the web, and thus we switch to Persona based authentication,
replacing the existing OAuth based flow. If you have an existing asciinema
account then fear not, you won’t lose access to it. When signing in just use
the same email address that you assigned to your account. If you don’t remember
which one you have used (or you haven’t set the email address at all) then
sign in (with your preferred email address) and you’ll be given an option to
locate your existing account by doing the OAuth dance for one last time.
Let us know what you think about this change. Enjoy!